1. Introduction
1.1 ARC6 (Robot Controller)

1.2 Key Feature
- Real-time robot motion controller for motion, force control of collaborative robots, compatible with AIDIN Robotics sensors
- Equipped with Xenomai for real-time control
- Supports ultra-fast communication via EtherCAT and ROS
1.3 Specification
| Index | ARC 6 | ARC 11 |
| CPU | 6th gen intel | 11th gen intel |
| CPU TDP | i7-6600U | i7-1185G7E |
| Memory Type | DDR4 2133MHz 8GB / mSATA128GB | DDR4 3200MHz 16GB / NVME 500GB |
| Power | 9-36VDC (12VDC) | 9-36VDC (12VDC) |
| Ethernet | Intel i210/i211 1G (2 Port) | Intel i219 1G / i225/226 2.5G (2 Port) |
| Connection | DP1.2 X1, DVI-D X 1 USB3.0 X 4, 8bit DIO Connection |
HDMI 2.0, DP1.4 X 2, C type DP1.4 X 1 USB3.2 gen2 X 4 USB type C X 1, 8bit DIO |
| Operating Humidity | 0~90% | 0~90% |
| Operating temperature | 0-60℃ | 0-60℃ |
| Interfaces | EtherNET, EtherCAT | EtherNET, EtherCAT |
| Operating System | 1. RT-OS Ubuntu 14.04 Xenomai 2.4 2. RT-OS Ubuntu 20.04 Xenomai 3.2.4 (SOEM) (Pick 1) |
RT-OS Ubuntu 20.04 Xenomai 3.2.4 (SOEM) |
2. Installation Guide
2.1 Components
-
ARC6 Controller (1 EA) with Xenomai + EtherCAT RTOS Applied
2.2 Wiring
-
User Name: gene / Password: a
-
The Ethernet port marked with the “CAT” label is dedicated to the EtherCAT Master.
-
Other Ethernet ports are available for general network communication.

3. Tutorial
-
This tutorial is conducted using an Elmo Driver. If a different EtherCAT slave is connected, normal operation may not be guaranteed.
-
This tutorial demonstrates motor current control using an Elmo Driver.
Please ensure that motor driver tuning has been completed before proceeding.
-
If you are using a different EtherCAT slave, it is recommended to first complete Section 4: EtherCAT Slave Configuration & PDO Mapping.
-
The example code provided below operates in Free-run mode.
If you intend to use DC mode, the code must be modified accordingly.
3.1 Wiring
-
Connect the EtherCAT IN port of the Elmo Driver to the EtherCAT port on the ARC6 controller.
3.2 Current Control
3.2.1 For Xenomai version 2.6.5
-
open three terminal windows.
- (터미널 1) roscore
- (터미널 2) rosrun elmo_ethercat main
- (터미널 3) rosrun elmo_ethercat current_control
-
In the current_control terminal, enter the motor index (starting from 0) and then input the desired current value to apply current to the motor.
-
The current input range is –1000 to 1000.
-
0: 0 A (no current applied)
-
-
-
1000: Continuous current applied
-
-
The Actual Position and Actual Current values can be monitored in the main terminal.
3.2.2 For Xenomai version 3.1
-
open two terminal windows.
- (터미널 1) roslaunch elmo_ethercat main.launch
- (터미널 2) rosrun elmo_ethercat current_control
-
In the current_control terminal, enter the motor index (starting from 0) and then input the current value to apply current to the motor.
-
The allowable current input range is –1000 to 1000.
-
-
0: 0 A (no current applied)
-
-
-
1000: Continuous current applied
-
-
The Position and Actual Current values can be monitored in the main terminal.
4. EtherCAT slave Configuration & PDO mapping
-
If the number of EtherCAT slave devices is changed, a different type of EtherCAT slave is used, or different PDOs are required, the EtherCAT-related code must be modified accordingly.
-
Please note that the code modification process differs between Xenomai 2 (IGH EtherCAT) and Xenomai 3 (SOEM EtherCAT).
4.0 Changing the Number of EtherCAT Slave Devices (Applicable to Xenomai 2.6.5 / 3.1)
-
This modification method is used only when the PDO mapping for the target devices has already been configured, and only the number of slave devices needs to be changed.
-
In the provided tutorial code, modifications can be applied directly when using an Elmo driver and Anybus.
-
However, proper operation is ensured only when the devices are connected in the following order: Master → Elmo Driver → Anybus
4.0.1 Modification Method
-
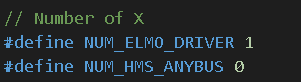
In the file include/Elmo_EtherCAT.h, modify the following values depending on the device:
-
NUM_ELMO_DRIVER for the Elmo driver
-
-
-
NUM_HMS_ANYBUS for the Anybus device
-
-
If the number of devices is set to 0, the array size in src/main.cpp will also become 0, which will cause a compilation error.
In this case, please either:
- Comment out the relevant code, or Declare an alternative variable instead of using the original one.

-
Additionally, when the number of devices is set to 0, the PDO read buffer functions for the corresponding device in src/main.cpp must also be commented out.

4.1 EtherCAT Code Modification: Xenomai 2.6.5 (IGH EtherCAT)
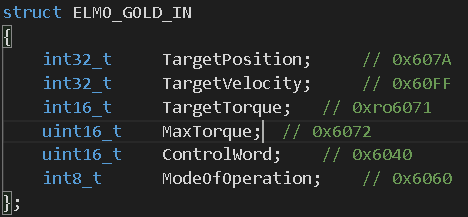
4.1.1. include / Elmo_EtherCAT.h
-
First, modify the Elmo_EtherCAT.h file located in the include directory.
-
Update the value to match the number of PDO entries after modification.

-
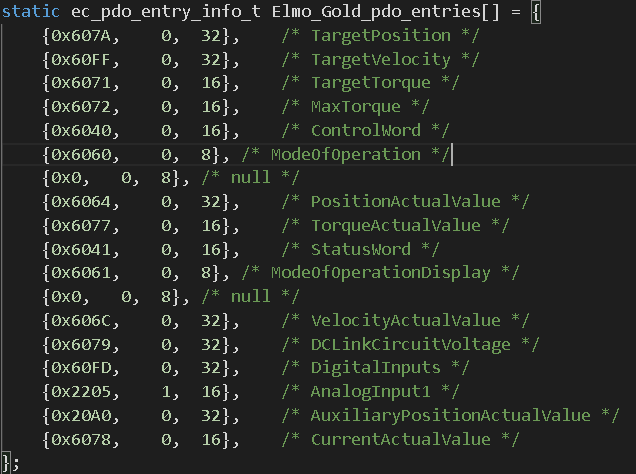
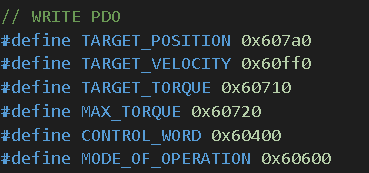
As shown in the figure, enter the combined address value consisting of the index and subindex of the PDO entry to be added or modified. (ex) index : 0x607a, subindex : 0 ⇒ 0x607a0)

-
Update the information for the added or modified PDO entries in ec_pdo_entry_info_t XX_pdo_entries
• Specify the values in the following order: index, sub-index, and bit width
• RX entries must be listed behind TX entries.
-
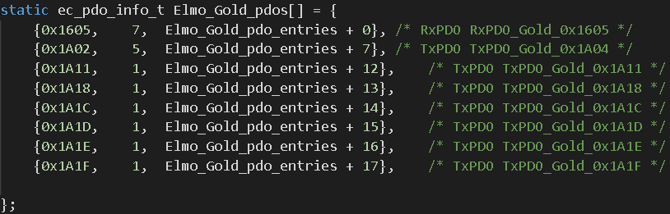
Update the information for the added or modified PDOs in ec_pdo_info_t XX_pdos.
-
Specify the following values in order:
PDO address / number of entries in the PDO / offset calculated as (Elmo_Gold_pdo_entries + X + number of entries)
- RX PDOs must be listed above TX PDOs
-
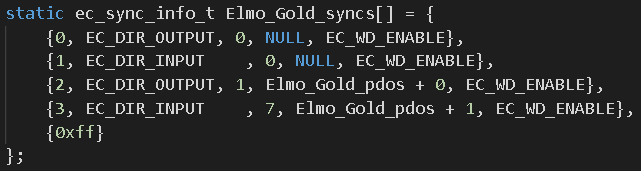
- ec_sync_info_t XX_syncs
-
Set EC_DIR_OUTPUT for OUTPUT and EC_DIR_INPUT for INPUT.
-
Update the value according to the modified number of PDOs. (ex) {2, EC_DIR_OUTPUT, 1, Elmo_Gold_pdos + 0, EC_WD_ENABLE}, → {2, EC_DIR_OUTPUT, 2, Elmo_Gold_pdos + 0, EC_WD_ENABLE},
-
-
Modify the Entry Struct
Add the PDO entry information to the entry structure in the same order as the newly added PDO entries.

-
Modify the Offset and Bit Offset Structures
Add offset and bit offset variables for the newly added PDO entries.
All variables must be declared using the uint32_t data type.

4.1.2 src/Elmo_EtherCAT.cpp
-
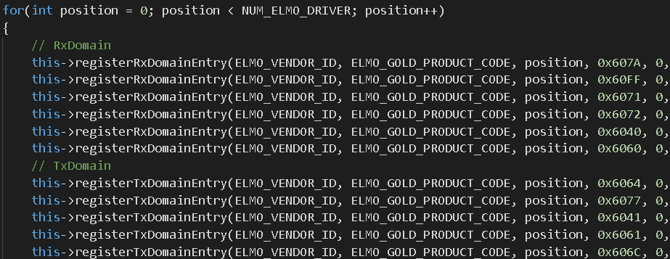
Modify EthercatMaster::initDomain()
-
Add the new entries following the same format as the existing registerRXDomainEntry() / registerTXDomainEntry() functions.
When adding entries, make sure to update the following accordingly:
-
Address
-
Subindex
-
Offset variable
-
Bit offset variable
-
-
-
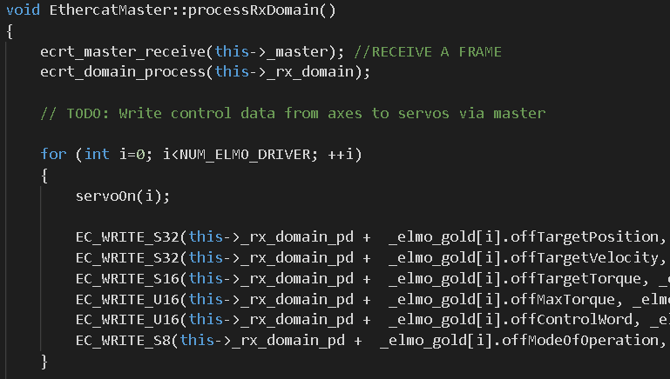
Modify EthercatMaster::processRxDomain()
-
Add an EC_WRITE function following the same structure as the existing implementation.
When adding the new entry:
- Modify the offset and input parameter variable names accordingly.
-
For EC_WRITE_XX, replace XX with the appropriate data type and bit width of the entry. Use U for Unsigned
-
EX)UseU for Unsigned, Use S for Signed, Signed 32-bit → S32
-
-
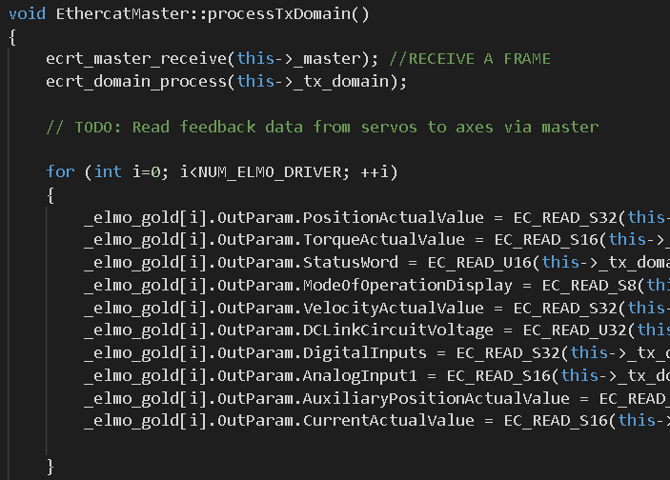
Modify EthercatMaster::processTxDomain()
-
Similar to Step 2, add an EC_READ function following the same structure
-
Use EC_READ_XX with the appropriate data type and bit width, as in Step 2
-
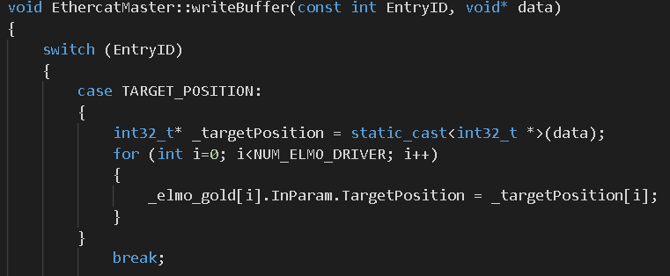
- Modify EthercatMaster::writeBuffer() / EthercatMaster::readBuffer()
-
For RX, add the entry to writeBuffer. / For TX, add the entry to readBuffer
-
Add the new entries following the same structure as the existing ones,
and ensure that the data type is correctly specified when making the modifications.

-
4.1.3 src/main.cpp
-
Add EtherCAT Data Array
-
Add a data array according to the data type being used.

-
-
Add readBuffer / writeBuffer Calls in my_task_proc()
-
For TX, use readBuffer to receive data and store it in the data array defined in Step 1.
-
For RX, use writeBuffer to send data from the data array to the slave device.
-
![]()
![]()
4.1.4 Adding a Different Type of Device
-
When adding a different type of device, follow Steps 4.1.1 to 4.1.3 as usual. However, just as the Elmo and Anybus structures are separated, you must create an additional structure for the new device and define its configuration there.
-
The order of the structures and for-loops must follow the slave connection order from the master.
-
Example:
If the connection order is Master → Elmo → Anybus, then the for-loop order in Section 4.1.2 must also follow: Elmo → Anybus
-
Additional modifications are also required:
-
Add Vendor ID and Product Code
-
Define the corresponding Vendor ID and Product Code in

-
-
Modify Class Declarations in Elmo_EtherCAT.h
-
In the ec_pdo_entry_reg_t declaration, add entries for both RX and TX by multiplying the number of PDO entries by the number of devices, following the same format as the existing implementation.

- The newly added device structure must also be registered and included.

-
-
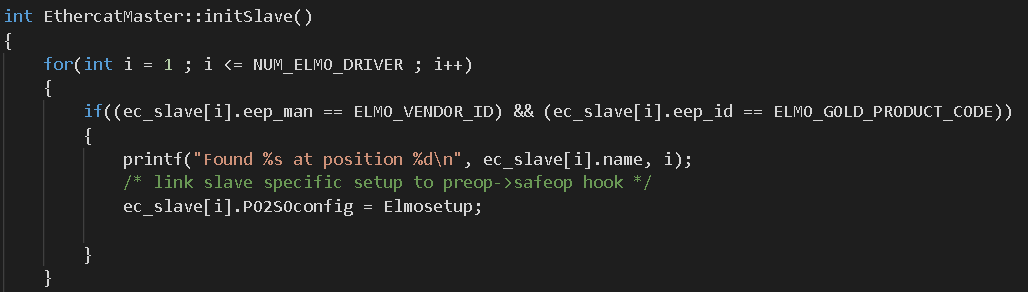
Modify EthercatMaster::initSlave() in Elmo_EtherCAT.cpp
-
Add a new for-loop following the existing implementation to initialize the newly added device.
-
4.2 EtherCAT Code Modification: Xenomai 3.1 (SOEM EtherCAT)
4.2.1 include/Elmo_EtherCAT.h
-
As shown in the figure, enter the combined address value consisting of the index and subindex of the PDO entry to be added or modified.
-
Example: Index: 0x607A, Subindex: 0 → 0x607A0
-
-
Modify the Entry Struct
-
Add the newly added PDO entry information in the same order as defined earlier.
-
4.2.2 include / Elmo_EtherCAT.cpp
-
Modifythe Setup Function
-
Either Method 1 or Method 2 may be used. However, depending on the device, the SDOs may only be applied correctly when written in a specific order.
-
In such cases, only Method 2 may work.
-
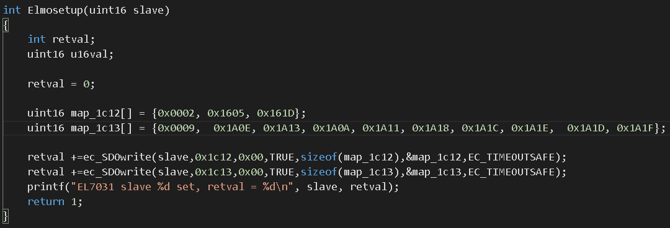
Method 1: Using map_1c12 / map_1c13 (Tutorial Code)
-
All PDO mapping information can be written at once to the 0x1C12 / 0x1C13 addresses.
-
map_1c12 is used for RX PDOs. / map_1c13 is used for TX PDOs.
-
In each array: The first element specifies the total number of PDOs. The following elements define the PDO addresses to be mapped, in order.
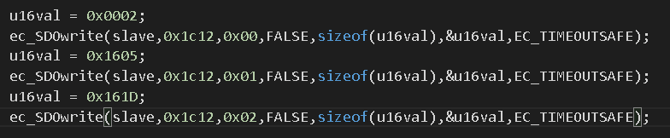
Method 2: Using ec_SDOwrite
-
If writing all values to 0x1C12 / 0x1C13 at once is not supported, use the ec_SDOwrite function to write the entries one by one.
-
For RX, add the entry to writeBuffer. / For TX, add the entry to readBuffer.
-
Add the new entries following the same structure as the existing ones, and make sure to update the data type accordingly.
4.2.3 src/main.cpp
- Add EtherCAT Data Array
Add a data array according to the data type being used.
-
Add readBuffer / writeBuffer Calls in my_task_proc()
- For TX, use readBuffer to receive data and store it in the data array defined in Step 1.
- For RX, use writeBuffer to send data from the data array to the slave device.


4.2.4 Adding a Different Type of Device
* When adding a different type of device, follow Steps 4.2.1 to 4.2.3 in the same manner. As with the separation of Elmo and Anybus structures, an additional structure must be created for the new device and configured accordingly.
* There are also several additional modifications required:
- Add Vendor ID and Product Code
- Define the corresponding Vendor ID and Product Code in

- Define the corresponding Vendor ID and Product Code in
- Modify Class Declarations in Elmo_EtherCAT.h
- Add the newly created device structure to the class declarations.

- Add the newly created device structure to the class declarations.
- Modify EthercatMaster::initSlave() in Elmo_EtherCAT.cpp
- Add an additional for-loop following the existing implementation to initialize the newly added device.
- Add an additional for-loop following the existing implementation to initialize the newly added device.
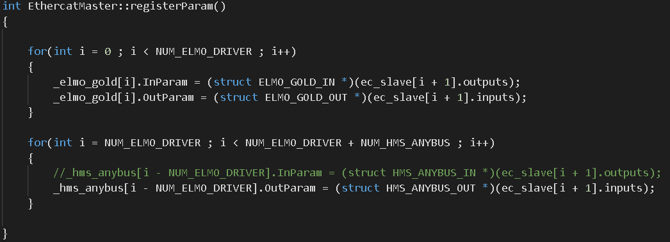
- Modify registerParam() in Elmo_EtherCAT.cpp
- Add an additional for-loop, following the existing implementation, to register parameters for the newly added device.
- Add an additional for-loop, following the existing implementation, to register parameters for the newly added device.