---
title: 로봇 모션 제어기(ARC6)
description: test
---
[콘텐츠로 건너뛰기](https://help.aidinrobotics.co.kr/arc6-robot-controller-ko#main-content)
- [한국어 - 대한민국](https://help.aidinrobotics.co.kr/arc6-robot-controller-ko)
- [English (영어)](https://help.aidinrobotics.co.kr/en/arc6-robot-controller)
한국어 - 대한민국
번역을 위한 하위 메뉴 보기
[](https://help.aidinrobotics.co.kr/?hsLang=ko-kr)
- [Full 매뉴얼](https://help.aidinrobotics.co.kr/full-%EB%A7%A4%EB%89%B4%EC%96%BC)
- [Install 가이드](https://help.aidinrobotics.co.kr/%EC%9D%B8%EC%8A%A4%ED%86%A8%EB%A0%88%EC%9D%B4%EC%85%98-%EA%B0%80%EC%9D%B4%EB%93%9C)
- [문의하기](https://www.aidinrobotics.co.kr/contact)
기본 탐색 열기
기본 탐색 종료
- [Full 매뉴얼](https://help.aidinrobotics.co.kr/full-%EB%A7%A4%EB%89%B4%EC%96%BC)
- [Install 가이드](https://help.aidinrobotics.co.kr/%EC%9D%B8%EC%8A%A4%ED%86%A8%EB%A0%88%EC%9D%B4%EC%85%98-%EA%B0%80%EC%9D%B4%EB%93%9C)
- [문의하기](https://www.aidinrobotics.co.kr/contact)
- - [한국어 - 대한민국](https://help.aidinrobotics.co.kr/arc6-robot-controller-ko)
- [English (영어)](https://help.aidinrobotics.co.kr/en/arc6-robot-controller)
한국어 - 대한민국
번역을 위한 하위 메뉴 보기
- [Official Site](https://www.aidinrobotics.co.kr/)
[Official Site](https://www.aidinrobotics.co.kr/)
무엇을 도와드릴까요?
- 검색 필드가 비어 있으므로 제안 사항이 없습니다.
1. [에이딘로보틱스 기술자료](https://help.aidinrobotics.co.kr/?hsLang=ko-kr)
2. [Full 매뉴얼](https://help.aidinrobotics.co.kr/full-%EB%A7%A4%EB%89%B4%EC%96%BC?hsLang=ko-kr)
2026년 2월 2일
# 로봇 모션 제어기(ARC6)
## 🚫 본 e-manual은 당사가 제공한 대상외에 무단 공유를 금지합니다 ✅ revision date: 2024.01.12
### **1. 제품 소개**
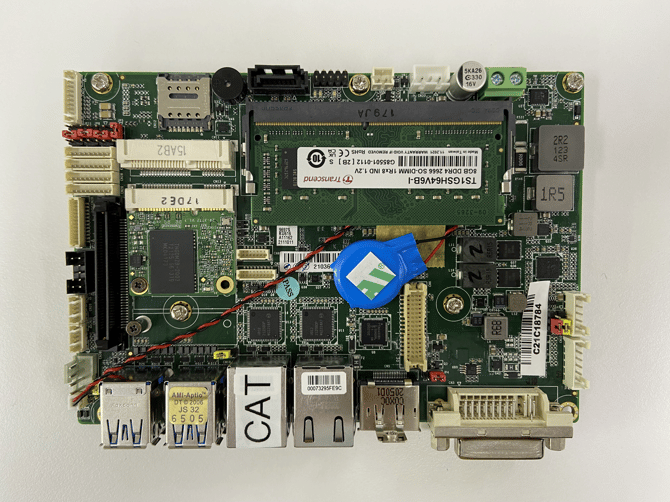
#### **1.1 ARC6 (Robot Controller)**
#### **1.2 특장점**
- 에이딘로보틱스의 센서와 호환하여 협동로봇의 모션/힘 제어를 위한 실시간 로봇 모션 제어기
- 실시간 제어를 위한 Xenomai 탑재
- 초고속 통신 EtherCAT 및 ROS 지원
#### **1.3 사양**
| **Index** | **ARC 6** | **ARC 11** |
| --- | --- | --- |
| CPU | 6th gen intel | 11th gen intel |
| CPU TDP | i7-6600U | i7-1185G7E |
| Memory Type | DDR4 2133MHz 8GB / mSATA128GB | DDR4 3200MHz 16GB / NVME 500GB |
| Power | 9-36VDC (12VDC) | 9-36VDC (12VDC) |
| Ethernet | Intel i210/i211 1G (2 Port) | Intel i219 1G / i225/226 2.5G (2 Port) |
| Connection | DP1.2 X1, DVI-D X 1 USB3.0 X 4, 8bit DIO Connection | HDMI 2.0, DP1.4 X 2, C type DP1.4 X 1 USB3.2 gen2 X 4 USB type C X 1, 8bit DIO |
| Operating Humidity | 0~90% | 0~90% |
| Operating temperature | 0-60℃ | 0-60℃ |
| Interfaces | EtherNET, EtherCAT | EtherNET, EtherCAT |
| Operating System | 1. RT-OS Ubuntu 14.04 Xenomai 2.4 2\. RT-OS Ubuntu 20.04 Xenomai 3.2.4 (SOEM) (Pick 1) | RT-OS Ubuntu 20.04 Xenomai 3.2.4 (SOEM) |
### **2. 설치 가이드**
#### **2.1 구성품**
- Xenomai + EtherCAT RTOS가 적용된 ARC6 x 1EA
#### **2.2 연결 (wiring)**
- **사용자 이름 : gene / 비밀번호 : a**
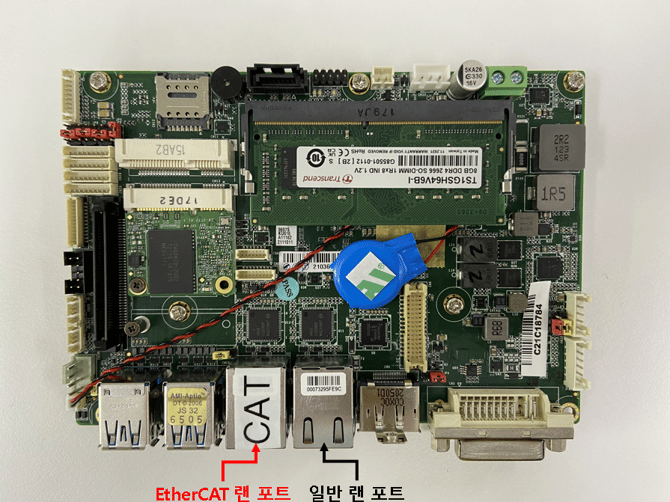
- EtherCAT Master 포트의 경우 CAT 스티커가 붙은 랜 포트 사용
- 다른 랜 포트의 경우 일반 인터넷용으로 사용 가능
### **3. Tutorial**
- 해당 튜토리얼은 Elmo Driver를 연결하여 진행합니다. 다른 EtherCAT slave를 연결하고 진행할 경우 정상 작동하지 않을 가능성이 높습니다.
- Elmo Driver를 이용해 모터의 전류제어를 진행하는 튜토리얼입니다. 모터 드라이버 튜닝 이후 진행 바랍니다.
- **다른 EtherCAT slave를 사용하는 경우, 4. EtherCAT slave Configuration & PDO mapping을 먼저 진행하시는걸 추천드립니다.**
- **아래 튜토리얼은 Freerun 모드에서 작동하는 코드입니다. DC mode로 사용하려는 경우 따로 코드를 수정하셔야 합니다.**
#### **3.1 연결 (wiring)**
- Elmo Driver의 EtherCAT IN 포트와 ARC6의 EtherCAT 랜 포트와 연결
#### **3.2 코드 실행 (Current control)**
##### **3.2.1 Xenomai 2.6.5의 경우**
- 터미널 3개를 엽니다.
\- (터미널 1) roscore
\- (터미널 2) rosrun elmo\_ethercat main
\- (터미널 3) rosrun elmo\_ethercat current\_control
- current\_control 터미널에서 모터 번호(0번부터 시작)를 입력하고, 전류 값을 입력해주면 모터에 전류가 가해집니다.
- 전류값 입력의 경우 -1000 ~ 1000까지이며, 0의 경우 0A, 1000의 경우 continious current가 가해집니다.
- Actual position, Actual current의 경우 main 터미널에서 확인할 수 있습니다.
**3.2.2 Xenomai 3.1의 경우**
- 터미널 2개를 엽니다.
\- (터미널 1) roslaunch elmo\_ethercat main.launch
\- (터미널 2) rosrun elmo\_ethercat current\_control
- current\_control 터미널에서 모터 번호(0번부터 시작)를 입력하고, 전류 값을 입력해주면 모터에 전류가 가해집니다.
- 전류값 입력의 경우 -1000 ~ 1000까지이며, 0의 경우 0A, 1000의 경우 continious current가 가해집니다.
- position, actual current의 경우 main 터미널에서 확인할 수 있습니다.
### **4. EtherCAT slave Configuration & PDO mapping**
- **EtherCAT slave 장비 수 변경,** 다른 종류의 EtherCAT slave 장비, 다른 PDO를 사용하고 싶은 경우 EtherCAT 관련 코드를 수정하여야 합니다.
- **Xenomai2(Igh EtherCAT)과 Xenomai3(SOEM EtherCAT)의 코드 수정법이 다르니 주의바랍니다.**
#### **4.0 EtherCAT slave 장비 수 변경 (Xenomai 2.6.5/3.1 공통)**
#### 4.0 EtherCAT slave 장비 수 변경 (Xenomai 2.6.5/3.1 공통)
- 해당 수정은 이미 원하는 장비의 PDO mapping에 관련한 코드는 이미 다 수정되었고, slave 수만 변경하는 경우에 사용되는 방법입니다.
- 제공되는 튜토리얼 코드의 경우 Elmo driver, anybus를 사용하는 경우 바로 수정 가능합니다.
**다만, Master → Elmo driver → Anybus 순으로 연결해야지만 정상 작동됩니다.**
##### **4.0.1 수정 방법**
- include/Elmo\_EtherCAT.h 파일에서 Elmo driver의 경우 NUM\_ELMO\_DRIVER, Anybus의 경우 NUM\_HMS\_ANYBUS를 수정하면 됩니다.
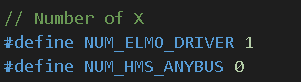
- 위와 같이 장비 수를 0으로 변경할 경우, src/main.cpp에서 Array 안 숫자가 0이 되어버려 컴파일 에러가 발생합니다. 주석처리 혹은 동일한 변수 대신 다른 변수로 선언 부탁드립니다.

- 또한 장비 수가 0인 경우 src/main.cpp에서 해당 장비의 PDO에 대한 readbuffer 함수는 주석처리 해야합니다.

#### **4.1 EtherCAT 코드 수정 : Xenomai 2.6.5 (Igh EtherCAT)**
##### **4.1.1 include/Elmo\_EtherCAT.h**
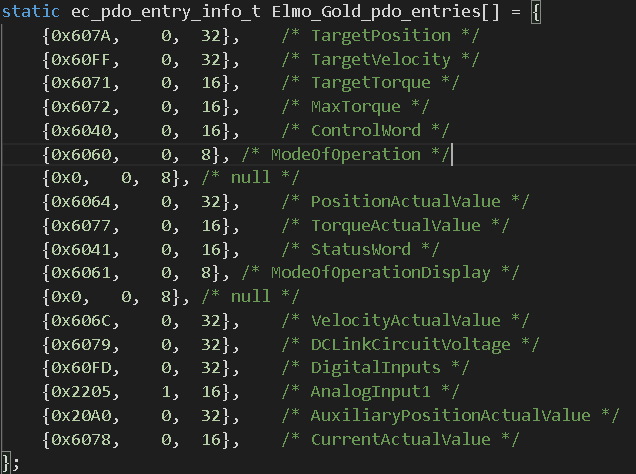
- include 디렉토리에 있는 Elmo\_EtherCAT.h 파일을 먼저 수정합니다.
1. 수정하고 난 뒤의 PDO entry 개수로 변경합니다.

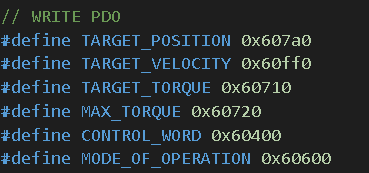
2. 사진과 같이 추가/변경할 PDO entry의 index, subindex를 합친 주소값을 작성합니다.
(ex) index : 0x607a, subindex : 0 ⇒ 0x607a0)
3. ec\_pdo\_entry\_info\_t XX\_pdo\_entries에 추가/변경한 PDO entry에 대한 정보를 반영해줍니다.
• index, subindex, 비트수 순서로 작성.
• **RX entries들이 TX entries보다 위에 있어야 합니다.**
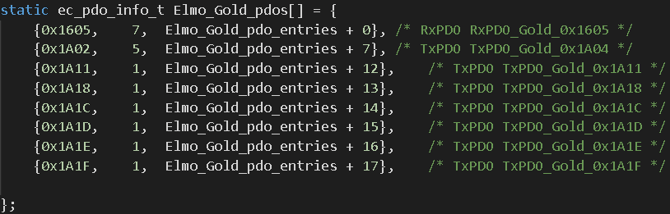
4. ec\_pdo\_info\_t XX\_pdos에 추가/변경한 PDO에 대한 정보를 반영해줍니다.
• PDO 주소값 / 해당 PDO에 있는 entry 개수 / 직전 Elmo\_Gold\_pdo\_entries +X 에 해당 PDO entry 개수를 더하여 Elmo\_Gold\_pdo\_entries +X+entry로 작성
**• RX PDO들이 TX PDO보다위에있어야합니다.
**
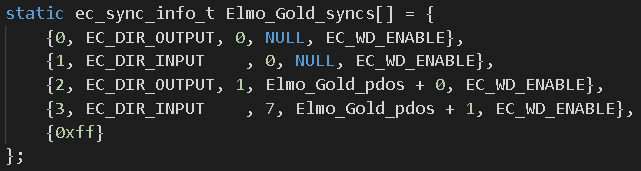
5. ec\_sync\_info\_t XX\_syncs
• OUTPUT의 경우 EC\_DIR\_OUTPUT, INPUT의 경우 EC\_DIR\_INPUT를 수정
• 변경한 PDO 개수로 수정
(ex) {2, EC\_DIR\_OUTPUT, 1, Elmo\_Gold\_pdos + 0, EC\_WD\_ENABLE},
→ {2, EC\_DIR\_OUTPUT, 2, Elmo\_Gold\_pdos + 0, EC\_WD\_ENABLE},
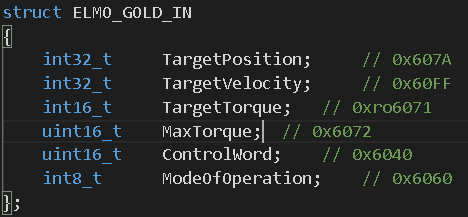
6. entry struct 수정
• 추가한 PDO entry의 정보를 넣은 순서에 맞게 추가
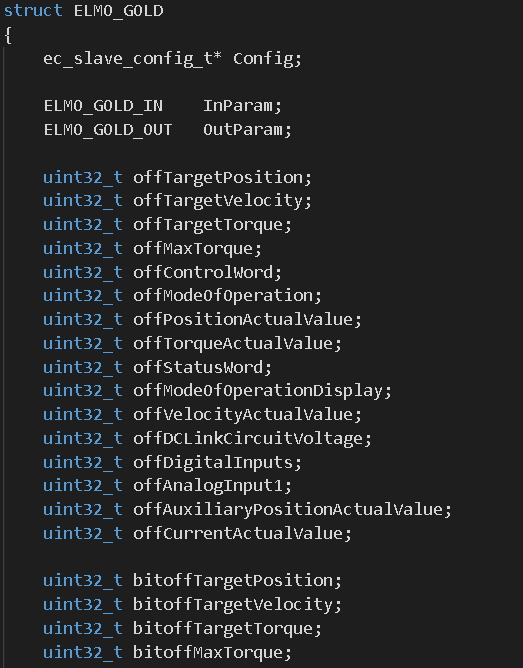
7. offset, bitoffset struct 수정
• 추가한 PDO entry에 대한 offset, bitoffset 변수 추가 선언. 모두 uint32\_t 자료형으로 선언
##### **4.1.2 src/Elmo\_EtherCAT.cpp**
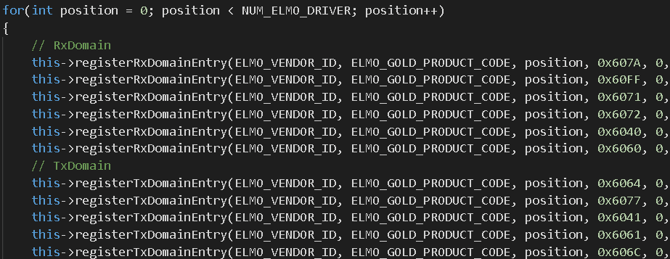
1. EthercatMaster::initDomain() 수정
• 기존에 있는 registerRX/TXDomainEntry함수와 같은 틀로 추가하되, 주소값, subindex, offset, bitoffset 변수명을 변경하여 추가
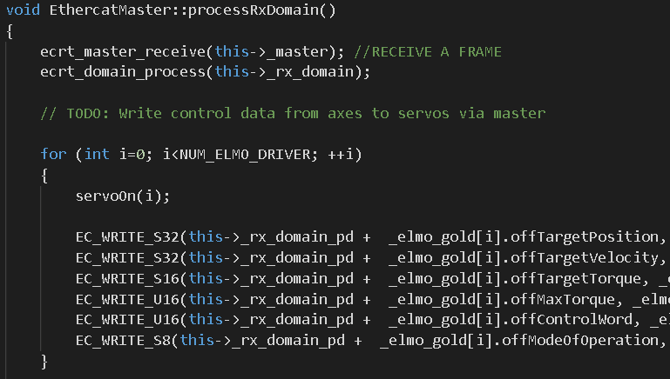
2. EthercatMaster::processRxDomain() 수정
• EC\_WRITE함수를 같은 틀로 추가하되, offset, Inparam 변수명을 변경하여 추가
• EC\_WRITE\_XX에서 XX의 경우 해당 entry의 자료형, 비트수로 변경하여 추가
• ex) Unsigned의 경우 U, Signed의 경우 S를 붙여 Signed 32비트의 경우 S32
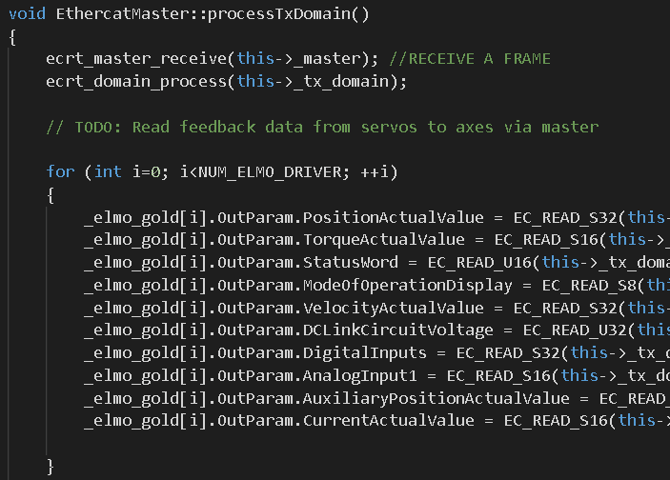
3. EthercatMaster::processTxDomain() 수정
• 2와 비슷하게 EC\_READ를 같은 틀로 추가하되, offset, Outparam 변수명을 변경하여 추가
• 2와 동일하게 EC\_READ\_XX를 자료형, 비트 수에 맞게 변경하여 사용
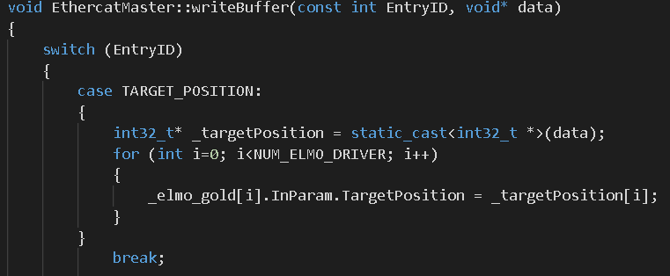
4. EthercatMaster::writeBuffer/EthercatMaster::readBuffer 수정
• Rx의 경우, writebuffer / Tx의 경우 readbuffer에 추가
• 기존에 있는 것들과 같은 틀로 추가하되, **자료형에 주의하여 변경**
##### **4.1.3 src/main.cpp**
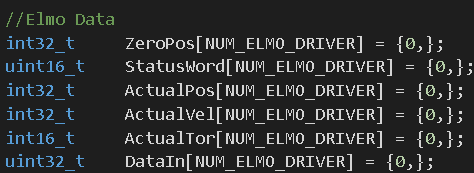
1. EtherCAT Data array 추가
• 사용하는 자료형에 맞게 Data array 추가
2. my\_task\_proc 함수 안의 readbuffer/writebuffer 함수 추가
• Tx의 경우 readbuffer를 이용해 받아온 데이터를 1의 Data array에 저장
• Rx의 경우 writebuffer를 이용해 Data array에 있는 데이터를 slave로 전송


##### **4.1.4 다른 종류 장비 추가**
- 다른 종류의 장비를 추가할 경우, 4.1.1 ~ 4.1.3을 그대로 수행하되, Elmo와 Anybus struct가 나뉘어 있는 것 처럼 추가로 struct를 추가하여 그곳에 넣어주어야 합니다.
- **Master기준으로 연결된 slave 순서 순으로 struct, for문 등을 배치하여야 합니다.**
- **ex) Master→Elmo→Anybus 순일 경우 4.1.2의 for문 순서 또한 Elmo, Anybus 순으로 작성**
- 이외에도 몇가지 더 수정해야할 것들이 존재합니다.
1. Elmo\_EtherCAT.h에서 Vendor ID, Product Code 추가

2. Elmo\_EtherCAT.h에서 class 선언자 수정
• ec\_pdo\_entry\_reg\_t에서 기존에 작성되어 있는것 처럼 entry 개수에 장비 수를 곱한 값을 rx, tx 모두 추가해주어야 합니다.

• 추가한 장비 struct를 추가해주어야 합니다.

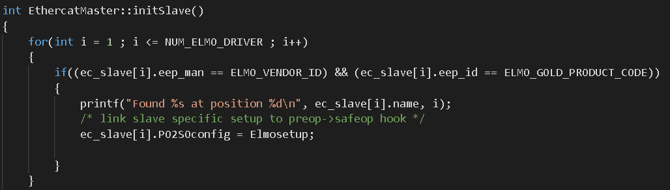
3. Elmo\_EtherCAT.cpp에서 EthercatMaster::initSlave() 수정
• 기존에 작성되어있는 것과 같이 for문을 하나 추가하여 새로운 장비에 대한 initializing 코드를 추가해 주어야 합니다.
### **4.2 EtherCAT 코드 수정 : Xenomai 3.1 (SOEM EtherCAT)**
##### **4.2.1 include/Elmo\_EtherCAT.h**
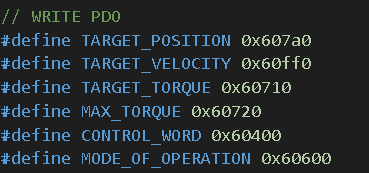
1. 사진과 같이 추가/변경할 PDO entry의 index, subindex를 합친 주소값을 작성합니다.
(ex) index : 0x607a, subindex : 0 ⇒ 0x607a0)
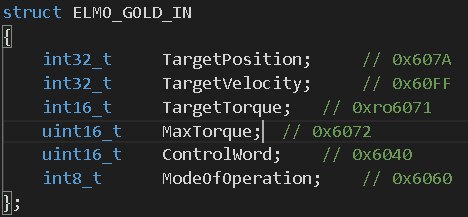
2. Entry struct 수정
• 추가한 PDO entry의 정보를 넣은 순서에 맞게 추가합니다.
##### **4.2.2 include/Elmo\_EtherCAT.cpp**
1. Setup 함수 수정
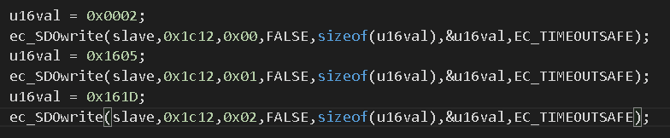
• 방법 1, 방법 2 두 가지 중 아무 것이나 사용해도 무방하나, 특정 장비의 경우 sdo를 넣는 순서에 따라 적용되지 않게 프로그래밍 되어 있어 방법 2만 가능한 사례가 존재했습니다.
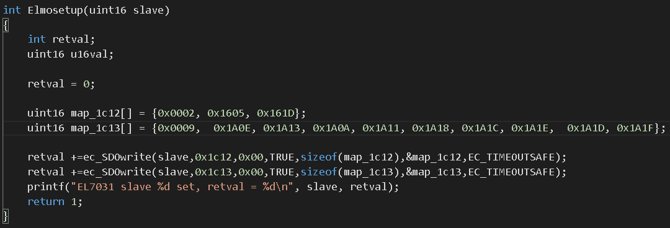
방법 1. map\_1c12/map\_1c13 사용 (튜토리얼 코드)
• 한줄로 0x1c12/0x1c13 주소값에 정보를 전부 넣을 수 있습니다.
• map\_1c12는 RX, map\_1c13은 TX에 관한 Array입니다.
• 각 Array의 첫번째 열은 PDO의 총 개수, 그 다음부터는 넣고 싶은 PDO의 주소값을 입력합니다.
방법 2. ec\_SDOwrite 사용
• 한번에 0x1c12/0x1c13에 넣으면 안되는 경우 ec\_SDOwrite 함수를 이용해 한 열씩 넣어줍니다.
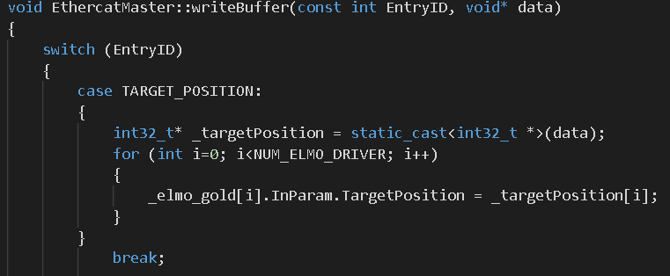
2. EthercatMaster::writeBuffer/EthercatMaster::readBuffer 수정
• Rx의 경우, writebuffer / Tx의 경우 readbuffer에 추가
• 기존에 있는 것들과 같은 틀로 추가하되, **자료형에 주의하여 변경
**
##### **4.2.3 src/main.cpp**
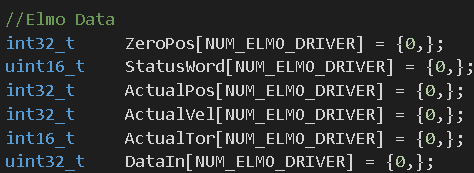
1. EtherCAT Data array 추가
• 사용하는 자료형에 맞게 Data array 추가
2. my\_task\_proc안의 readbuffer/writebuffer 함수 추가
• Tx의 경우 readbuffer를 이용해 받아온 데이터를 1의 Data array에 저장
• Rx의 경우 writebuffer를 이용해 Data array에 있는 데이터를 slave로 전송


##### **4.2.4 다른 종류 장비 추가**
- 다른 종류의 장비를 추가할 경우, 4.21 ~ 4.2.3을 그대로 수행하되, Elmo와 Anybus struct가 나뉘어 있는 것 처럼 추가로 struct를 추가하여 그곳에 넣어주어야 합니다.
- 이외에도 몇가지 더 수정해야할 것들이 존재합니다.
1. Elmo\_EtherCAT.h에서 Vendor ID, Product Code 추가

2. Elmo\_EtherCAT.h에서 Vendor ID, Product Code 추가
• 추가한 장비 struct를 추가해주어야 합니다.

3. Elmo\_EtherCAT.cpp에서 EthercatMaster::initSlave() 수정
• 기존에 작성되어있는 것과 같이 for문을 하나 추가하여 새로운 장비에 대한 initializing 코드를 추가해 주어야 합니다.
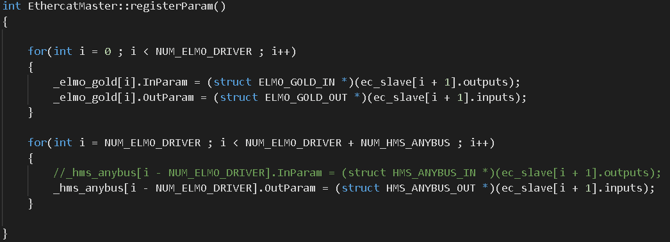
4. Elmo\_EtherCAP.cpp에서 registerParam() 수정
• 기존에 작성되어있는 것과 같이 for문을 하나 추가하여 새로운 장비에 대한 parameter register 코드를 추가해 주어야 합니다.
[**^ 처음으로 돌아가기**](https://help.aidinrobotics.co.kr/arc6-robot-controller-ko#firstpage-ARC6)
- [Full 매뉴얼](https://help.aidinrobotics.co.kr/full-%EB%A7%A4%EB%89%B4%EC%96%BC?hsLang=ko-kr)
- [인스톨레이션 가이드](https://help.aidinrobotics.co.kr/%EC%9D%B8%EC%8A%A4%ED%86%A8%EB%A0%88%EC%9D%B4%EC%85%98-%EA%B0%80%EC%9D%B4%EB%93%9C?hsLang=ko-kr)
[](https://help.aidinrobotics.co.kr/help?hsLang=ko-kr)
**(주)에이딘로보틱스, AIDIN ROBOTICS Inc.**
5F, 12-20, Simin-daero 327beon-gil, Dongan-gu, Anyang-si,Gyeonggi-do, South Korea (14055)
영업/마케팅/PR: [sales@aidinrobotics.co.kr](mailto:sales@aidinrobotics.co.kr) | 채용문의: [hr@aidinrobotics.co.kr](mailto:hr@aidinrobotics.co.kr) | 기업문의: [info@aidinrobotics.co.kr](mailto:info@aidinrobotics.co.kr) | Tel: +82-31-360-7926
Copyright @ AIDIN ROBOTICS 2024 I [개인정보처리방침](https://www.aidinrobotics.co.kr/privacypolicy)